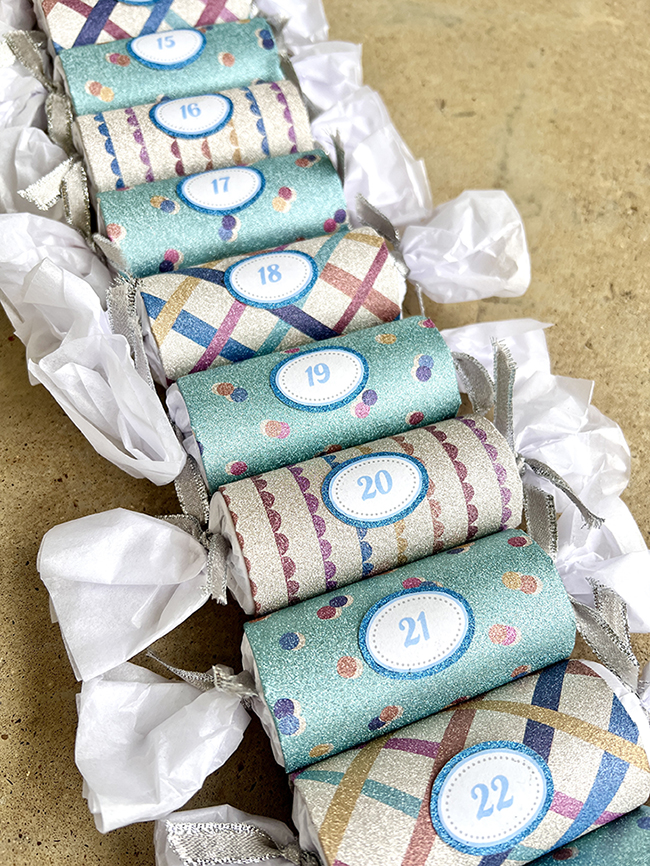
After being stretched thin, this year's advent calendars had to be a little quicker to make than those of past years. Here's how to do it:


After being stretched thin, this year's advent calendars had to be a little quicker to make than those of past years. Here's how to do it:

Watch how to make this advent calendar out of crafting tubes and Christmas paper.
Buy candy in bulk and add slips of paper with silly little prompts on them—customize them for age. (For example: For a three year old...What do you think Santa eats for breakfast when he gets back from delivering all the presents?)
An example of another color scheme.


Also included in each packet is a slip of paper with instructions for a very short activity for the family to do. For example: "Family Hug! Wish each other a happy holiday. Now eat your candy!"
These packets each hold a different candy from the other—one for each person—and the kids can easily rip into them since they're made with napkins!


Looking for a simple, modern Christmas craft? Here’s a tutorial on how you can make this Alpine Advent Christmas calendar—plus, it comes with free templates for the trees.


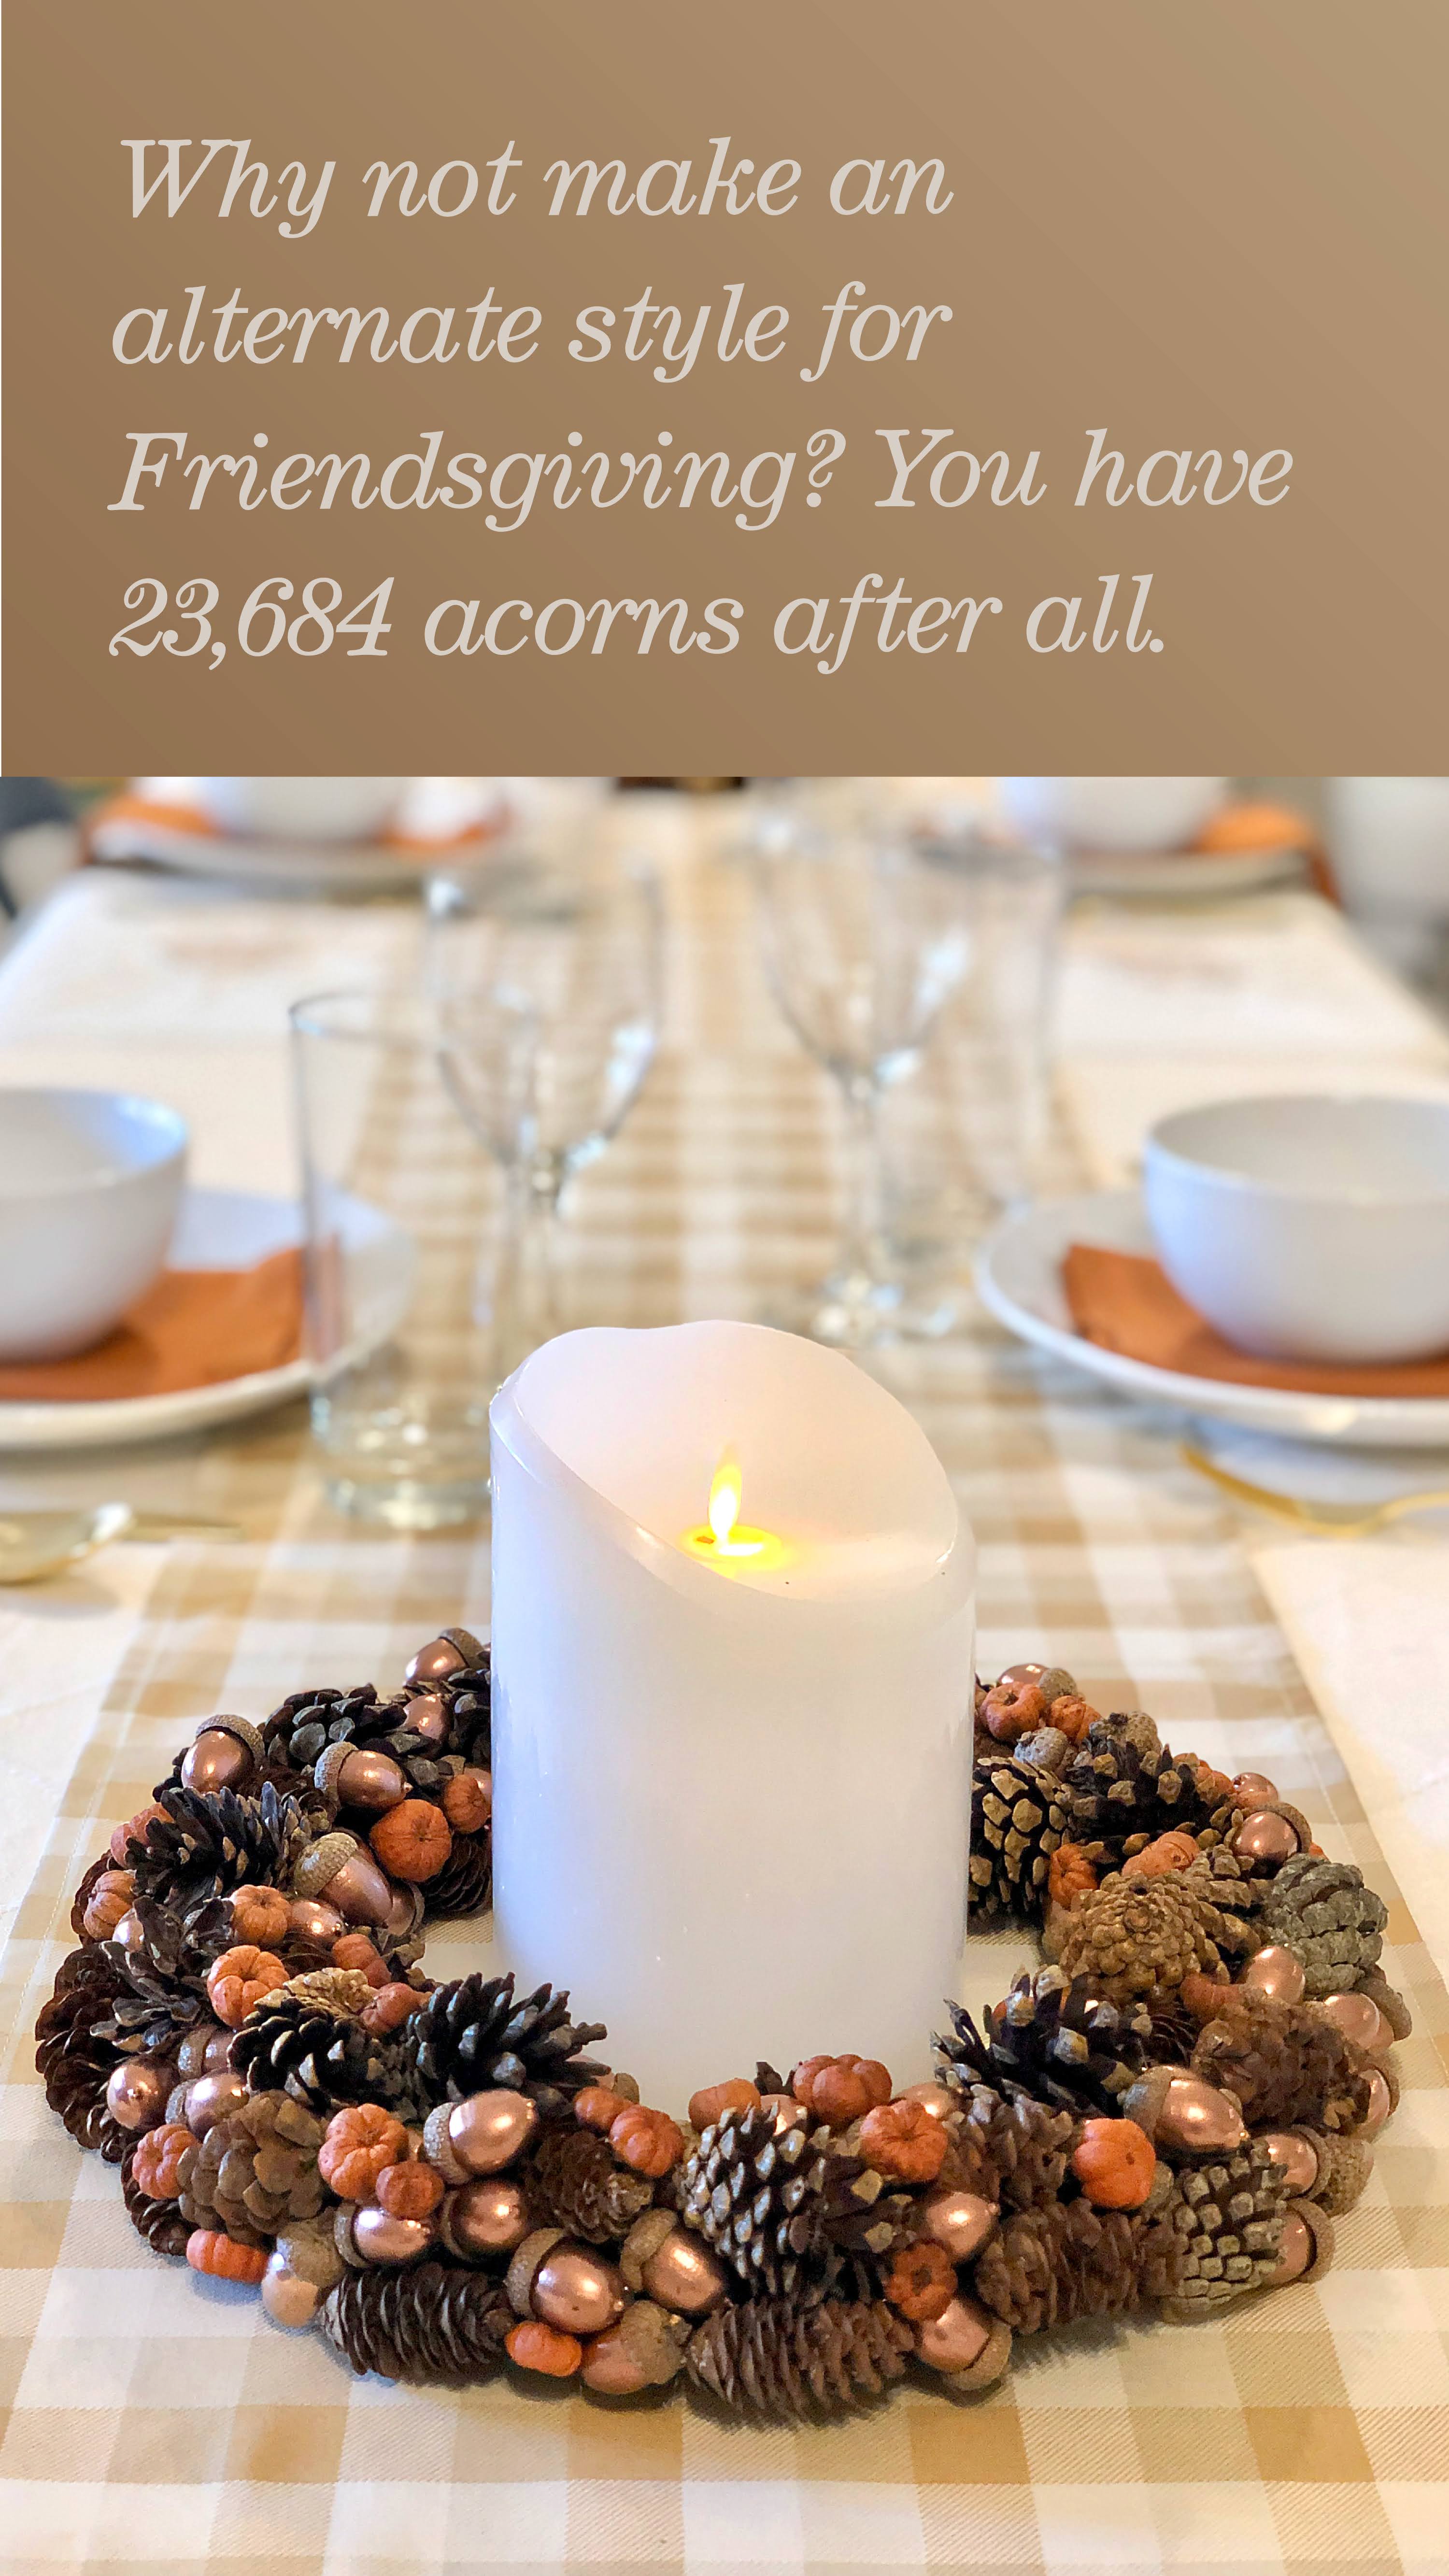
Do you have hundreds of acorns falling out of your tree every autumn? Do you wonder what you could do with all of that free crafting supply?! I’ve got a couple of natural autumn decoration ideas to help you use up your acorns. A full list of supplies you’ll need can be found at the end of this post.


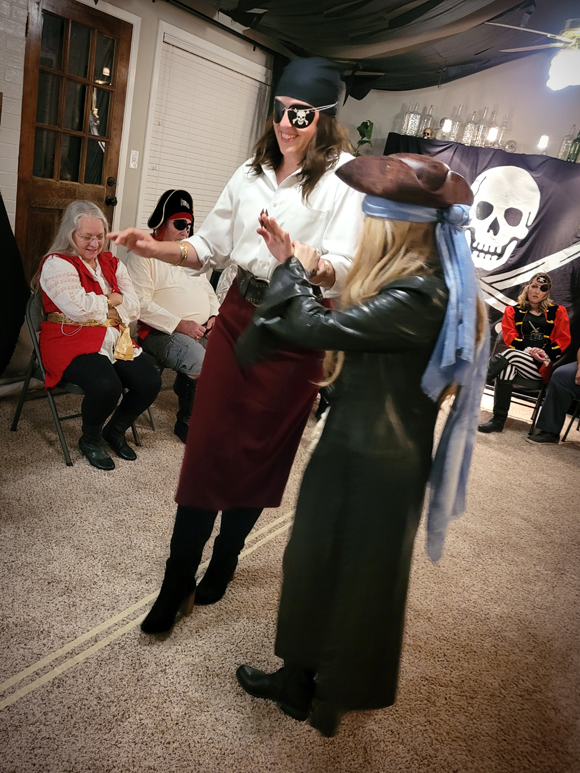
My husband has a man crush on Johnny Depp as Captain Jack Sparrow in the Pirates of the Caribbean movies. So when said husband turned 40, I threw him a pirate costumed dinner party. He dressed up as Captain Sparrow and guests were invited to dress as any other pirate (generic or cosplay.) For simplicity, all my inspiration and details came from only the first movie in the series.
Here are some ideas on how you can can throw an epic pirate themed costume dinner party like ours that's perfect for adults or can easily be tweaked for kids!
The Invitations
It always adds a bit of je ne sais quoi to build up anticipation for a party and put forth a task or problem to be solved. For this pirate themed birthday party, send out invitations to yer mateys under the premise that Captain Jack Sparrow is looking for a new crew and there will be a chance to show their mettle at a specified time and date. Be sure to outline the dress code and tell them to come prepared! (See wording example in the image below. Illustration was purchased here.)

Our invitations were coffee stained, edge burnt, rolled up, tagged and tied with a piece of leather. Then they were hand delivered to each person’s mailbox whom we wanted to invite. (See how to age paper with coffee and salt here.)

The Decorations
Before guests arrive, post another bit of paraphernalia outside your door to build more anticipation for what might be awaiting them inside. Did you notice? The wording on the posting shown below comes from the first Pirates of the Caribbean movie! (Illustration purchased here.)

Upon entering the house, guests can be greeted with a large pirate flag (which becomes a perfect spot for photos), and ragged black sails undulating from the ceiling above (black plastic tablecloths with slashes in them. A very cheap trick with major impact.) This pirate flag was handmade by projecting the skull image onto a black king size sheet, traced with chalk and then painted with inexpensive acrylic craft paint.

Cover any large space, like a bar, with netting and empty liqueur bottles stopped with candles and corks. (I had spent a few weeks ahead of time collecting the bottles from friends and neighbors.) The fish netting I found here.


Another wall could hold a pirate map (found here), or any other pirate information you think is interesting or humorous.


Since this party was for adults, I thought it might be of interest to post bits of information about real pirates in history. And since pirates often had nicknames, I made up this chart (which you can download and print on your own cool paper here) and posted it among the historical pirate information. It was a hit!

If you don’t have skeletons, I recommend borrowing a couple from a friend if you can. They'll fill up any empty spaces you have and infuse humor into the room. The fellow shown below, I positioned holding chocolate gold coins, one in his mouth and a couple in his hand.

Halfway through the evening I noticed someone had eaten the chocolate offering from the skeleton’s hand—something I thought was both funny and totally appropriate!

And lastly don’t forget the mantle. Place more bottles, books, candles and whatever else you might have laying around that feels pirate, ocean, or ship themed. On mine, I made sure to include portrait skulls of the pirate brethren, Morgan and Bartholomew.

The Centerpieces and Place Settings

Since we’d set up three, 6 foot tables end to end, I created two different centerpieces and set them out in an alternating fashion down the row of tables.
First, you can’t go wrong with skulls and drippy candles for a pirate theme.


Second, platters of apples MUST be included too. This is the only food we see Captain Jack Sparrow eat in the first movie, and captain Barbosa would literally kill to eat one, so it makes for a very fitting table decoration idea.


And as for the place settings, I suggest you put the first activity (a questionnaire) folded upon the plate with a feather pen. (These are cheap to make if you buy a box of pens and a package of feathers at your local craft store and make them yourself.) It gives guests something to do while waiting for the party to get started...this activity will be explained shortly.

ALSO on the plate, under the questionnaire, place a small score card for keeping points. Here’s a link to print the score card.

Four Pirate Party Activities
Since the pirate guests are essentially “trying out” to become Jack Sparrow’s new mates, each person will be earning points throughout the evening. Those with the most points at the end will be the new crew!
1. SCROLLS FOR EXTRA POINTS
First, DO NOT let the birthday boy or girl know what is written on the scrolls. In fact, don’t tell them about this activity at all.
As guests begin arriving, welcome them and ask them to draw one scroll each. The scrolls contain a small task that can be performed at any time during the evening and will award them an extra 5 points. (The guest may choose not to do it as well.) The guest can trade scrolls but can only do one scroll that evening.


Some examples of tasks include:
• Raise yer glass and give a toast, end it with “Drink up me hearties yo, ho!”
• Bend the knee and kiss a ring on Captain Jack Sparrow’s hand and say, “Captain Sir, ye have me loyalty.”
These ended up being hillarious! Our Captain Sparrow was happily caught off guard, as were the guests, when most of these tasks were performed. Here is a link to the tasks you could consider including in your evening.
2. HOW WELL DO YE KNOW THE CAPTAIN AND THE PIRATE WAY OF LIVIN'?
Remember the pamphlet I had at each place setting? Here’s a better look at the front.

Each one had a different quote from the movie printed on the back.

The instructions inside tell the players to “Try to to make yer answers match those of [the birthday person’s name].” They get points NOT necessarily for answering the questions correctly...but if their answers MATCH those of the party’s captain. Now there’s a twist! Here's a link to the inside and the answers.

Give guests time to work on this as you are waiting for others to arrive, they can also work on it during dinner and you can give them time a little after. Then go around the room, and have each pirate say aloud their answer to each question in turn, the captain answers last. In our group, some answers were funny, silly, and even revealing!
I can’t give you the link to the front or back of the pamphlet because I paid to use the stock illustrations. But I’ll share the link to the image on the front so you can purchase and create the pamphlet yourself. Link to skull ring image (front.) And here's a link to a similar sword and gun for the back.
3. FINDING GOLD
First you'll need a gold piece to show everyone. This could be a chocolate gold coin, or a piece of Aztec gold emulating the one from the movie, whatever you want as long as it’s gold. Just don’t make it any smaller than a quarter.
Explain to your pirate guests that Captain Sparrow needs a crew that is good at finding gold—obviously. If you are the MC for the evening, you'll be hiding the gold coin first. Send the pirates out of the room while you hide the coin. Bring them all back and play starts.

Rules: The coin must be hidden in plain sight. Make it EASY. Players shouldn't have to touch, move, open, or stand on anything to see it. The coin will be hidden within a certain boundary (our boundaries were the living room and the dining room.) Don’t be tricky in finding a hiding place, else you run the chance of game play taking too long. The quicker people can find it the better. Hints can be given if the searching takes too long.
The first person to find said coin will leave it in place, and shall quietly sit down without revealing where they saw the coin. The second player to see it does the same.
If you have a small number of guests, play can go until everyone has found the coin. We had 12 people in our group, so play ended at 6 people finding the coin otherwise it would have gone on too long. Assign points accordingly. (In our game, the first person received 3 points, the next 2 people got two points, and the next 3 people won one point each.)
The next person to hide the coin can either be the looser of the game or the pirate with the most points so far that evening—not fair but—pirate!
4. PIN THE X ON THE MAP
You can’t have a party theme that inherently includes eye patches and a map and not play “pin the X on the map!” (Map found here.)

But this game gets a little tweaking. Explain that if the pirates want to be part of the crew they need to know how to read a map so well that they can do it with their eyes closed AND guess where the Captain might want to go next.

Pass out the Xs and have the players write their name on them.
Then, tell the birthday person pick out a place on the map without revealing it to anyone. Now the players must guess where that place might be and put their X in that spot while being blinded—or rather, while wearing TWO eye patches (patches purchased here.) AND they must get to the map while walking a plank! Each time they step off the plank, they loose a point. Guests may shout out “ to the left” or “right a little more” to help their mateys.
The plank can be outlined by masking tape on the floor or you can use an actual plank of wood. I recommend the plank be about 10 inches wide and around 5 adult steps long. (Ours was bit too long and way too narrow. We ended up guiding the players by hand so they wouldn’t tip over. Though, it was a little funny—we all looked a bit drunk wobbling down the path and there wasn’t a drop of alcohol being served that night.)
After all Xs have been placed, the Captain goes last, blind like all the rest, and tries to place his X on the location he picked out earlier. All the players with the closest Xs to the Captain’s gets points.
Remember, no feeling around on the map. The first touch is where the X gets placed. But DO warn the player when they’ve reached the wall. And don’t forget to spin them before setting them free.
A link for a print out of Xs you can cut out is here.
WINNING AND ENDING THE EVENING WITH PHOTOS OPS
Have yer mateys add up their points. Those with the highest scores get a place on Captain Jack Sparrow’s new crew. You can give prizes or not, and I’m sure you can think of all kinds of ideas for that.
The map and the flag double as a great place for your new crew-mate photos. Do this toward the end, maybe while cake is being served, and don’t be shy—play a little for the camera!


After being stretched thin, this year's advent calendars had to be a little quicker to make than those of past years. Here's how to ...


