Monday, December 9, 2013

Strawberry Cake Decor

Need an idea for a cute cake? Here's a simple strawberry themed two tiered cake. Keep reading for instructions and tools you will need.
This cake was created for a Wilton cake class I took through Michael's a few years ago. I was so tired of making flowers that I wanted to do something a little different for our assignment. Enter the cute strawberry!
The strawberries are made of fondant and shaped by hand. The little seed indents are made with a tooth pick and the hull was cut out of fondant using the “star” shaped cutter below. Just pinch the tips and press a line down the center of each flap with a tooth pick. (Toothpicks are such a handy go-to tool!)

The blossoms used the rose cutter seen below. I put a slit between each petal with an Exacto knife so that I could lift and curve each petal. The centers are piped in using a grass tip with yellow frosting.

Lastly, can you see the little curly tendrils on the cake? Those were painted on with a brush and green food coloring.
All the cutters, including the leaf shape (not shown) can be found in the Wilton Rose Bouquet Flower Cutter Set found here.

Fore more cake ideas CLICK HERE.

Thursday, December 5, 2013

Orange Cranberry Nut Bread

This bread is soft, sweet, slightly chewy and with the little bites of tart cranberries mixed in—it is easily one of my favorite sweet bread recipes. I normally gift it this time of year with instructions to try a slice lightly toasted with butter, the flavor reaches new heights when prepared this way—that's the magic of warm bread and butter.
I'm not even sure where the recipe came from originally—but my mom has made it for years. My copy was typed on a typewriter by her. And the directions are pretty much a one-liner saying something like this:
Mix all ingredients together and bake at 350 for 60 minutes.

Ummm….yeah. About that. So I'll do you one better and get a little more detailed so you don't end up with a bite full of salt!

Orange Cranberry Nut Bread:

Makes 3 medium loaves (7 3/8" x 3 5/8" pans)
If you half the recipe it makes one large loaf—bake for about 60 minutes.

In a mixer combine until blended:
4 Tablespoons softened butter
2 eggs
2 tsp salt
2 cups granulated sugar

Add and mix in:
1 1/2 cup 100% orange juice (not from concentrate)
2 cups chopped fresh cranberries (I use the food processor to chop them)

In a separate bowl, sift together:
4 cups white flour
1 tsp baking soda
3 tsp baking powder
1 cup chopped walnuts

Add dry ingredients to wet ingredients and combine until just mixed, scraping the bowl a few times as you go.

Grease and flour your pans. Fill them 2/3 full of batter. Bake in a preheated oven at 350°F for about 45 minutes or until a toothpick inserted comes out clean.

Saturday, November 30, 2013

Footstools Named Hugs and Kisses

For three years we've been trying to find the ottoman that matches our couch at the outlet. It wasn't meant to be. So when I saw these (ugly) stools (below left) at Burlington Coat Factory for $29 each, I let the idea simmer for while that maybe I could recover them. Three months later they were still at the store (because of ugliness) so I snatched them up and forced them into playful stylishness.

It was difficult coming up with a design because it could be practically anything. Soon I had a stack of prints to choose from. Should I go retro? Playful? Matching or not? Finally, I decided since one stool would be for "her", and one for "him" we could have something that inferred this, but not so literally. And that's how we landed on Hugs and Kisses.

It was SO EASY to re-do these; sharing the process might give you some ideas of your own.

Let's start with the freezer paper stenciling.

ABOVE: First, the stencil is printed on the dull side of freezer paper and cut out. Next, the paper is ironed onto the intended project, shiny side down. It will stick because there's a thin coat of plastic on that side; when heated it will melt and lightly adhere to your material. 
ABOVE: Next, any exposed areas of material need to be blocked off. Take the material/stencil outside. Then the stencil can be spray painted with an oil based/matte spray paint. (Most spray paints are oil based. Just ask if it's not on the labeling.) It must be matte—I used Rustoleum double coverage.


ABOVE: Lastly the paper gets peeled away and the design is done! The paper leaves no residue (you can try using the stencil again, but it probably won't stick as well.) I'll bet you are thinking of all kinds of projects now aren't you?

Now let's move on to the upholstery.

After you've taken the existing fabric off your project, use it as a pattern. Cut out your new pieces and sew them up accordingly. 

The skirt was simple. Just one long strip, pleated and attached to the round top which I stenciled earlier. Then wrap it around, staple it, put the feet back on and you're good to go! 
There's a little video of the rehupolstering process here. Use the password: quickhug


These little things are so growing on me! At long last I have a husband who doesn't whine about not having an ottoman or coffee table for his feet, and finally his remedy to the situation—our kitchen stool with a pillow placed on top—is staying where it belongs. I could just hug and kiss these little guys for making my guy happy! Ok. And me too.

Update: It's been almost two years since I did these. The stencil is fading a bit, but that's to be expected. Otherwise they are in great shape. The only thing I would do differently is add extra padding for more comfort.

Tuesday, November 26, 2013

Cake Eight

I know, it's a weird title. A few years ago I took a cake class and this is the eighth cake…actually the eighth cake I've ever decorated in my life. Although there are some things I would do differently now…I still really like the white flowers on top of a marbled look. Hope this gives you some ideas.

Fore more cake ideas CLICK HERE.

Thursday, November 14, 2013

Gypsy Stew

Also called Olla Gitana, this dish from Spain is usually meatless. I really like this version though, and like all good recipes it will make your house smell wonderful…hmm cumin, paprika, rosemary... (Plus, I love anything I can make with my dutch oven!)

Gypsy Stew - Prep about 3 hours if using precooked beans. If using dry beans…add 3 more hours.

If using dried beans: cover and soak for at least three hours and then drain well:
  • 1 1/4 cup dry white kidney beans (such as navy beans)
In a large saucepan heat
  • 3 TBSP olive oil
than add and cook until soft
  • 1 chopped garlic clove
  • 1 chopped white or yellow onion
Next, add the presoaked beans and cover with water. Bring to a boil, then reduce heat and simmer for about 45 minutes. Then in a dutch oven, or large flame proof casserole dish, over the stove heat:
  • 1/3 cup or less olive oil
Add and cook until tender
  • 1 chopped garlic clove
  • 1 chopped white or yellow onion
Preheat the oven to 315 F.
Add and stir through the following
  • 1 tsp sweet paprika
  • 1 tsp smoked paprika
  • 2 tsp ground cumin
  • 1/4 tsp cayenne pepper
  • 1 tsp dried rosemary
  • 1 seeded and diced red bell pepper
  • 1 lb. 10 oz pork tenderloin diced
Cook until the pork is pale brown all over. Then add:

     •   One 14 oz. can diced tomatoes
     •   1 cup chicken stock

Bring to a boil, then cover and place in the over for 1 hour.
Then add:
  • the bean mixture
  • 2 medium diced firm potato, sweet potato (squash works too.)
Return to the oven for 30 minutes or until potato is tender.
Just before serving stir in:
  • chopped swiss chard
Season to taste before serving. 
We like to eat it with shredded cheese and a dollop of sour cream. It's great with tortilla chips too.

Adapted from Cooking Spanish by John Newton


Saturday, October 19, 2013

Make your own Batman Mask

Our youth group made these masks to add to care packages for the Ronald MacDonald House. The mask is quite simple and you will find yourself making more than one just to give away. Might as well!

Below is the pattern. Click on the image below to enlarge to fit on a 8.5 x 11 in sheet and print.

Cheap Cat Ears

Whip these up in about 30 minutes. This cat ear headband was designed so our youth group could make several of them to add to care packages we are delivering to families at the Ronald McDonald House. They are VERY easy and VERY cheap, and little girls will LOVE them.

Big girls might like them too :)

Click on the Directions below and print them off.
Click on the pattern below and print it off (at full size it should be 8.5 x 11)

Note: you do not need all the ears from the pattern. Just one big ear and one small one. I've put more on a page just in case you decide to have a cat making party and want more patterns per sheet.

Supplies:
Headbands—these were under $1.00 for three at Walmart)
One sheet of black and colored felt—each under $1.00
Hot Glue
Scissors

Thursday, September 26, 2013

Superheroes in Excellence

One of my Mia Maids suggested a Superhero theme for YW in Excellence this year. (She was beyond excited.) I threw together a quick outline of ideas and here's how it turned out.

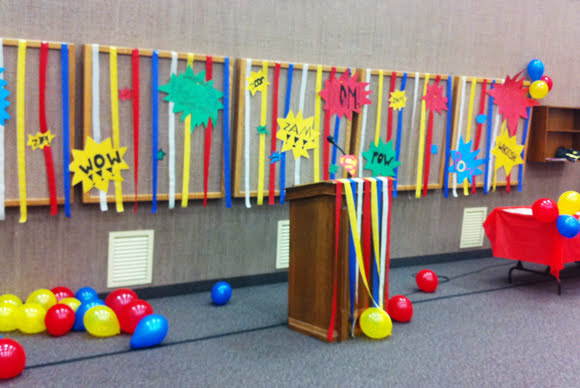
We had the girls help make starburst signs for the room.
We asked each of the girls to liken her assigned value to a superhero. For example: Batman showed faith in the people of Gotham when he continued to believe they would make the right choice. As young women we show faith by ________________.

We then glued their written parts to the back of their Superhero's symbol. This way there would be a fun visual for the audience to look at.

The girls were happy to tie our value colored tablecloths around their necks as capes. Aren't they awesome for playing along?

We didn't go all out this year, but I think the decorations were perfectly acceptable!
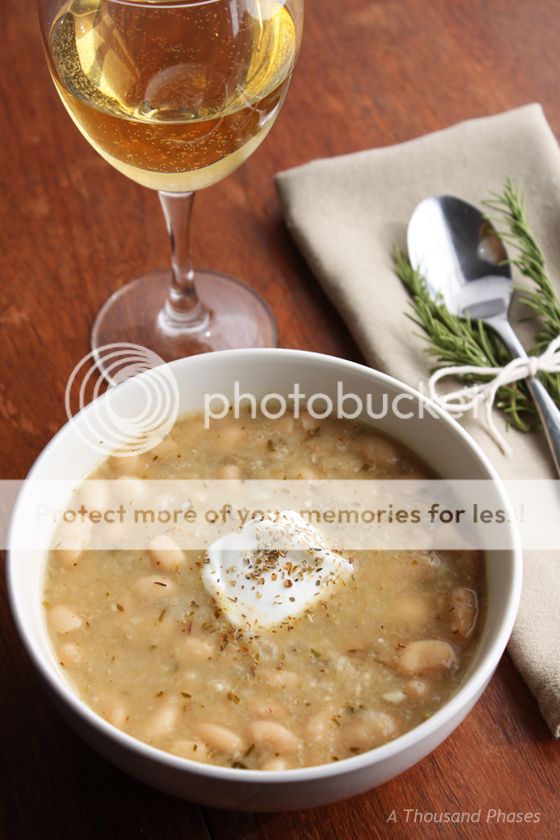
We tried to make our treats fit the theme too. I found candy and related it to a hero in some way. Although this was fun, I don't necessarily recommend it. The candy was a bit too expensive. I would go the colorful popcorn or rice crispy route only—which we did have in conjunction with the candy.)
Below is the outline of ideas for decorating, invitations, the program etc. You will see we didn't use them all, which is totally fine. I wrote it out so there would be options to choose from. Feel free to click on the outline below (which will bring it up larger) and print it off to begin creating your own event.

Sunday, August 4, 2013

Lemon Orange Wedding Cake

This cake was made for a young women's youth group activity, where we had wedding dresses for the girls to try on! So of course we had to have "wedding cake" as a refreshment.

It is a sour cream pound cake with homemade lemon/orange curd as the filling. I like using pound cake for tiered cakes...the bread holds up so well and the flavor and texture is SO good and dense. The floral decorating uses a brush embroidery technique. The cake took 5.5 hours to frost and decorate.

For more cake ideas CLICK HERE.

Saturday, January 19, 2013

Magic Pixie Dust

Last year, I gave my nieces a Fairy Portal. So Tinkerbell has been a frequent visitor to their house. I decided to ask Tinkerbell if she could collect some pixie dust so that I could give it as a gift for Christmas. The dust arrived in a cute little pouch with a tiny note from Tinkerbell describing how the magic works. 

"Sprinkle a little bit on your food and when you eat it, the magic will start working. Each color will do something different. One will help you to be brave, another smart, another happy, and lastly one to help you be a good listener. But use it wisely—it takes a long, long, long time to collect this much pixie dust because as you know the fairies receive only a cup at a time."


If you'd like to make your own, purchase sugar sprinkles and decorate the container with just about anything. Flowers, fabric, lace etc. Put it in a pouch or box that you decorate (or buy), don't forget the note from Tinkerbell and you've got a fun little, handmade gift.
If you're interested in a one-of-a-kind fairy portal, head on over to Etsy and visit Kim Detmers at Clayworks. She is so very sweet, does excellent work and her portals come well packaged with instructions.

Monday, January 14, 2013

Provençal White Bean Soup


This soup although simple is very flavorful. Adding the herbs turns this soup into a wonderful french style affair. Serve with sour dough bread. Omit the sausage if you want this to be a phase 1 meal (South Beach Diet)
Makes about 4, one cup servings

1. In a large saucepan heat over high heat:
     • 1 TBSP extra virgin olive oil

2. Add:
     • 1 small onion chopped
     • 1 celery stalk chopped
     • 2 two garlic cloves, peeled and minced
     • 1/2 tsp dried basil (or fresh, minced and doubled at least)
     • 1/2 tsp dried rosemary (or fresh, minced and doubled at least)
     • 1/4 tsp dried thyme (or fresh, minced and tripled at least)
     • 1/4 tsp salt (omit if adding ground sausage)

3. Reduce heat to medium/low and cook, stirring occasionally for about 15 minutes or until vegetables are softened.

4. (Optional)While vegetables are cooking, use frying pan to cook:
     • 1 package of either breakfast ground pork sausage or italian ground pork sausage.

5. When veggies are ready add to the saucepan:
     • 2 cans (15oz) of rinsed and drained cannelloni or great northern beans.
     • 1 1/2 cups lower sodium chicken or beef broth.

6. Transfer about 1/3 of the bean mixture to a blender and blend until smooth. Pour back into the sauce pan.

7. Add sausage to the soup. Stir and allow the mixture to heat until simmering. Salt and pepper to taste. Serve hot, and with a dollop of sour cream.