Tuesday, December 16, 2014

Fa la la!

Went a little crazy this year and hand made ALL my Christmas wrapping. I used some Higgins® Black Magic® Ink (watered down for a gray color) and Ikea Måla paper (from a roll) and started scribing with a paintbrush Fa la la on long swaths of the paper.
I was just going to wrap with it, but then there was enough left from which to make gift bags. (As seen on the left.) I made TWELVE of them. TWELVE. A little crazy maybe should be changed to a lot crazy.
And THEN I was having so much fun I scribbled MORE Fa la la's on some black paper with watered down white paint, to make boxes to hold some decidedly DELICIOUS and addictive Nutella truffles with Frangelico from MyBakingAddiction


Using eyelets in the lid, I strung black ribbon through it to create a loop pull. It made the perfect little container for the truffles. What a great presentation. I used this tutorial to make the boxes—which I love because this method doesn't leave any crease marks in visible areas of the box.
(There's some yummy cranberry orange bread from here  wrapped up in the photo below.) Isn't everything so lovely?
Now, you can go make your own wrapping paper!

Friday, May 9, 2014

New Beginnings: Girl on Fire

Although the idea of "Girl on Fire" for a New Beginning theme isn't original I think the young women pulled it off brilliantly. One of our Laurels found the idea and did all the research for refreshment and decorating ideas. The rest of the work was delegated between the girls and leaders.
I put the invitations together using the official movie poster fonts.
The girls created fireball poofs to hang from the ceiling.

And a welcome poster….

Our Beehive advisor created the dessert table and created labels for all the food using the font from the books. I was so excited to see she'd done that!
Keeping with the color over black theme, each girl painted a value onto black poster board and explained how the value keeps her spiritual flame burning.
We used all the appropriate labels for things such as:

Values = Districts
Girls Explaining the Values = Tributes
One of our girls received her Young Woman in Excellence that night = Victor

And the songs: The Spirit of God...like a fire is burning... and The Lord is My Light.

Of course there were speakers, a skit, and some teaching involved so everyone got to do something.

The skit was made up by the girls and was hilarious. The prompt was "Show us what Personal Progress is and how it works." So their skit included introducing PP to a classmate, carrying out a service project with her—raking leaves—and then going to a leader (played by a girl of course) to get it checked off in their books. We let the girls practice the skit a week beforehand—I'm glad because we got a lot of blank faces at first LOL.

It was a great evening…the Stake YW Leaders were there and couldn't stop their praising.  I LOVE that it was all headed up and started with one of the young women. I enjoy seeing what they want to do and the pleasure (and pride) on their faces when it all turns out.

I'm sorry, I do not have a template of the invitation to share at this time. (I think I deleted it by accident ugh.) But here's a .png torch file. Click on it to open it full size, then right click to download it. Note, this is the official logo for the Young Women organization of The Church of Jesus Christ of Latter-day Saints. It has been modified to fit this theme.

Tuesday, February 4, 2014

Olympic New Beginnings

The Winter Olympics are here again! What better theme for a New Beginnings? You can talk about going for gold—setting goals and accomplishing them. Have your girls march down the red carpet isle with their flag and introduce each theme. Give out awards and use lots of gold and silver everywhere...and golly—you could even fashion an Olympic torch out of the Young Women's logo.

Decorating Ideas:
During mutual have the girls cut out the Olympic rings and a whole TON of snowflakes.
Print off the invitations and help the girls assemble them as well.


Make winter cupcakes for refreshments. Don't forget the gold wrapper.


This cupcake display is just three boxes wrapped in white with ribbons wrapped around each one and then stacked. Brilliant!

Are you ready to know how we did some of this? Let's start with the flags. I'm sure you've heard of freezer paper stenciling by now? Print each value on the paper and then cut them out with an Exacto knife. Iron them onto the fabric and stencil them in.


The flags were 1/2 yard each. I made a casing on the side of each one which slipped easily over a wooden dowel. The flags stayed on nicely—and are removable for washing or if someone wants to hang them instead without the dowels (which we did the next year for a Royal Theme...you know, flags hanging in the "great hall"....)

Drill the appropriate size holes in a 2 x 4 and the dowels will stick in the display and show nicely. These flags have been used for various occasions, even the Stake has been using them. So they are worth the time investment.

Next up: Snowflakes.
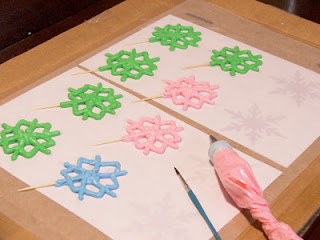
Print up a snowflake pattern you like. Tape the papers onto something flat and moveable. Then tape wax paper over that. 
Next whip up a batch of Royal icing and trace over the snowflakes. Don't forget to add a toothpick. These will take about 1-3 days to dry completely.

Lastly are the invitations.
Click Here: For blank pdf invitations. You'll have to import them into a program (like Word or Adobe Acrobat etc.) to fill in your own information and then cut them out following the crop marks.

For the ovals, once you've cut them out you'll punch two holes on either side to run the ribbon through. (We used gold and silver ribbon.)

Purchase multicolored paper. If you are holding the paper horizontally, you will want to cut a strip off the bottom so your invitation comes just to the top and bottom.
Paste the invitation in the middle and fold both flaps in. 

Punch holes in either side of the oval cut-out and thread ribbon through, tie in the back. Pass them out and you're good to go.


And now you're set! Just Google "Olympic New Beginnings" and you'll find all kinds of program content ideas.

SaveSaveSaveSaveSaveSaveSaveSaveSaveSaveSaveSave

Saturday, January 11, 2014

Pasta Italia: Easy Dish, Great for Groups

My husband made this dish up while he was in Italy for two years and ate it all the time. The ingredients were cheap and easy to find and well, it's really tasty! Several friends have asked for the recipe so here you go:

Note: don't worry too much about exact quantities. It's all to taste and according to how large your group is—in other words, we usually "eyeball" it. If you have questions send me a message.

Pasta Italia

You'll need equal parts (almost) of:

• ham, cubed
• Mozzarella cheese, cubed (we like less cheese, more tomato)
• tomatoes (any kind) cubed
• Rigatoni noodles work best, the big fat kind you can stick your thumb in. Yum. (the amount should be about 1/3 or less of the total ingredients.)
Note: we use whole wheat noodles for health reasons but rigatoni is hard to find, which is why you see a different pasta in the photo above.)

and also some

• olive oil
• fresh basil, one "package" finely chopped (if serving 6—10) If using fresh, a good fistful of leaves
• balsamic vinegar


1. In a large pot begin boiling the rigatoni. (Do NOT over cook, throw the noodles out if that happens…it just won't taste good in this dish and you will be disappointed.)

2. In a skillet add a bit of olive oil and allow to heat.

3. Add cubed ham to the skillet and cook until just browning on sides and still juicy. Set aside.

4. In a separate bowl, (while the ham is cooking) combine the cubed tomatoes, cheese, chopped fresh basil, and drizzle olive oil over the ingredients (to taste). Mix. see photo above.

5. Salt the mixture to taste.

6. When rigatoni is finished, drain and add all the ingredients to the pot (tomato/cheese mixture and ham) while the noodles are still hot.

7. Mix. Your cheese will begin melting, this is good.

Serve hot with balsamic vinegar on the table for drizzling. (This is a must!)
Great with French bread and fresh fruit.
Makes good leftovers too! Just reheat until cheese begins to melt.

Note: If you want this to be a South Beach Phase 1 meal, leave the pasta out.
If you want it to be a phase 2 meal, use 100% whole grain pasta.