With all this extra time at home we have these days I thought I'd let the creative juices flow and come up with my own unique ombre Valentine’s Day Pompom wreath design!
In my closet I have a bunch of wreath forms left over from the dollar store, Additionally, I have a friend who, having just acquired a few bags full of yarn was also looking for some way to use up her supply.
So we got together on Zoom, we started crafting!
Here are the supplies you will need for your ombre Valentine pompom wreath:
– 10 inch wreath form (most dollar stores carry these. Yes, mine is cut in half like a bagel—it was my genius penny pinching idea to get more forms for less.) The finished wreath will be around 13 or 14 inches in diameter.
– Red felt (Spend a little more for the good thick stuff.)
– Three skeins of yarn for making pompoms (medium pink, light pink, cream)
– 1.8 inch pompom maker, I bought mine on Amazon here. Four sizes are included in the box.)
– Wooden house ornament (The one I used came from World Market but is now sold out. However I have done a search for other options and styles and will include links to those at the end of this post.)
– Hot glue and gun
– Scissors
– Pink sewing floss and needle
– Corsage pins (optional, and I’ll explain why in step five of the directions)
FIRST
You’ll want to start crafting those cute soft pompoms with a 1.8 inch pompom maker as soon as possible. Pick your favorite show to set up in front of and get to wrapping, tying, clipping and shaping! You will need about:
15 medium pink pompoms
6 transition from medium to light pink pompoms (just alternate the colors you are using as you are wrapping. For mine, I wrapped one side half way with medium pink, then finished with light pink. And then for the other half I reversed the order in which I used the colors.)
15 light pink pompoms
6 transition from light pink to cream pompoms
15 cream pompoms
Note: you CAN skip making the transition pompoms, but I think they go a long way to helping the ombre effect look more smooth.
SECOND
Using your hot glue, begin attaching the pompoms. It’s easier to put the glue on the wreath form and then attach pompom. Glue a pompom on either side of the form and one in the middle and don’t be afraid to snuggle them right up against each other.
Start with either your lightest color or your darkest. When you are ready to attach your transition colors you will then start working from side to side of the form. The right side gets three transition colors, and then the left side gets three. Then, move on to the middle solid color, still working back and forth from side to side so everything stays even.
THIRD
Cut out multiple size hearts out of your felt, the example shows 13. And now that your wreath is assembled you can more easily see what size hearts you want make.
FOURTH
Using your needle and floss, stitch around the edges of each heart. Use an overcast or whip stitch. This will give them a finished look.
*FIFTH
Get ready to attach your hearts. Lay them out on the wreath to see how you would like them to look and where you would like them to rest. Notice amongst the large bunch of hearts above the house, that the bottom tips of the hearts point toward the house chimney. This is because I want them to seem as if they coming up out of the chimney. You can either glue them directly onto the wreath/pompoms OR you can try the following suggestion:
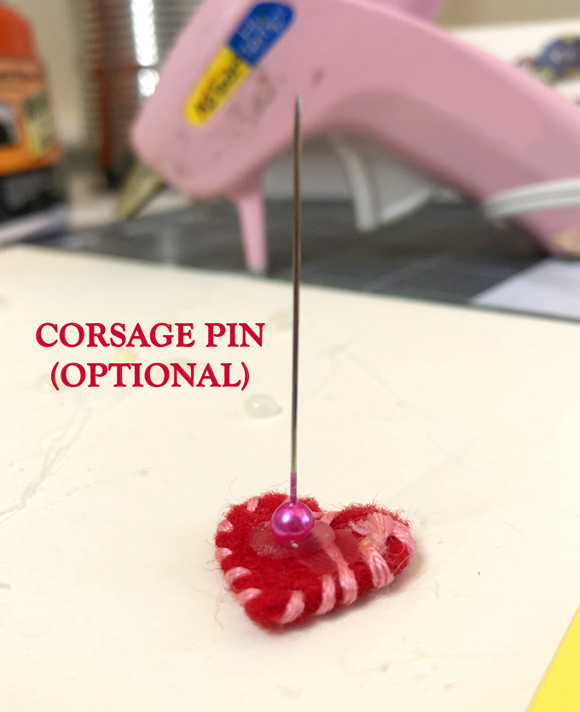
*Put a dab of hot glue on the back of a heart and place a corsage pin directly on top of it pointing up. (Corsage pins are longer than sewing pins.) When the glue is no longer hot, you can now push the hearts into the pompoms and turn them however you like. I personally like this option because first, I wanted more room to play with the placement of the hearts AFTER the wreath was done AND I like that the hearts almost seem like they are gently resting atop the pompoms instead of firmly pushed and glued into them. Does that make sense?
SIXTH
Figure out how you would like your little house to sit. Do you want it to be seen straight on as in the example? Or perhaps sitting at an angle? (Which I wish I had done now that I’ve been looking at it for a few days.)
Trim down the pompoms the house will be sitting on so they are flat. Now the house can sit firmly and straight. Glue it down and your done with your ombre Valentine’s Day wreath!
Links to little houses for the wreath:
TINSKY wooden lighted house on Amazon
Little wooden houses on Etsy from LFRustics
Simple house silhouette on Etsy from Bison Coating Supply
Small cottages on Etsy from PaintingsbyElena
Hand painted block houses on Etsy from ANAMARKOkids
If you want to purchase a plain block house and paint it yourself, there are several vendors on Etsy, just do a quick search under “little wooden houses” and many options will come up. You also have the option of creating your own out of chipboard or construction paper and it could be really quite lovely!


No comments:
Post a Comment