Sunday, August 4, 2013

Lemon Orange Wedding Cake

This cake was made for a young women's youth group activity, where we had wedding dresses for the girls to try on! So of course we had to have "wedding cake" as a refreshment.

It is a sour cream pound cake with homemade lemon/orange curd as the filling. I like using pound cake for tiered cakes...the bread holds up so well and the flavor and texture is SO good and dense. The floral decorating uses a brush embroidery technique. The cake took 5.5 hours to frost and decorate.

For more cake ideas CLICK HERE.

Saturday, January 19, 2013

Magic Pixie Dust

Last year, I gave my nieces a Fairy Portal. So Tinkerbell has been a frequent visitor to their house. I decided to ask Tinkerbell if she could collect some pixie dust so that I could give it as a gift for Christmas. The dust arrived in a cute little pouch with a tiny note from Tinkerbell describing how the magic works. 

"Sprinkle a little bit on your food and when you eat it, the magic will start working. Each color will do something different. One will help you to be brave, another smart, another happy, and lastly one to help you be a good listener. But use it wisely—it takes a long, long, long time to collect this much pixie dust because as you know the fairies receive only a cup at a time."


If you'd like to make your own, purchase sugar sprinkles and decorate the container with just about anything. Flowers, fabric, lace etc. Put it in a pouch or box that you decorate (or buy), don't forget the note from Tinkerbell and you've got a fun little, handmade gift.
If you're interested in a one-of-a-kind fairy portal, head on over to Etsy and visit Kim Detmers at Clayworks. She is so very sweet, does excellent work and her portals come well packaged with instructions.

Monday, January 14, 2013

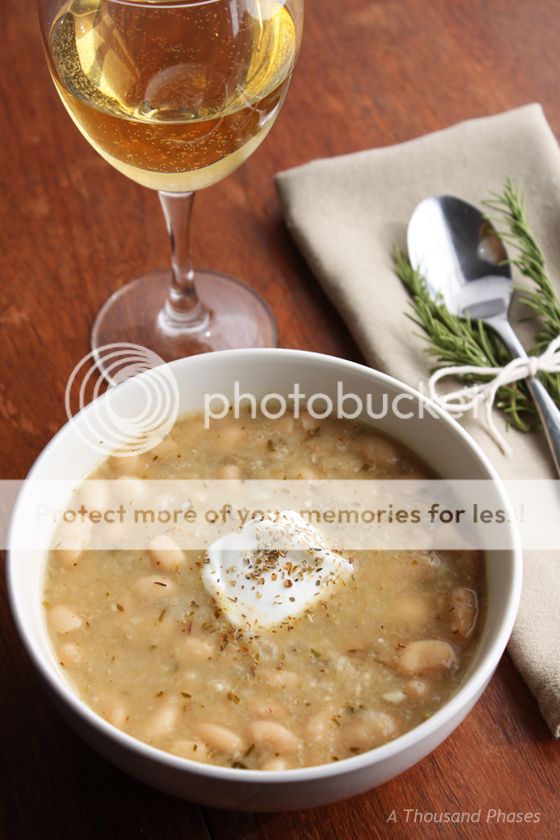
Provençal White Bean Soup


This soup although simple is very flavorful. Adding the herbs turns this soup into a wonderful french style affair. Serve with sour dough bread. Omit the sausage if you want this to be a phase 1 meal (South Beach Diet)
Makes about 4, one cup servings

1. In a large saucepan heat over high heat:
     • 1 TBSP extra virgin olive oil

2. Add:
     • 1 small onion chopped
     • 1 celery stalk chopped
     • 2 two garlic cloves, peeled and minced
     • 1/2 tsp dried basil (or fresh, minced and doubled at least)
     • 1/2 tsp dried rosemary (or fresh, minced and doubled at least)
     • 1/4 tsp dried thyme (or fresh, minced and tripled at least)
     • 1/4 tsp salt (omit if adding ground sausage)

3. Reduce heat to medium/low and cook, stirring occasionally for about 15 minutes or until vegetables are softened.

4. (Optional)While vegetables are cooking, use frying pan to cook:
     • 1 package of either breakfast ground pork sausage or italian ground pork sausage.

5. When veggies are ready add to the saucepan:
     • 2 cans (15oz) of rinsed and drained cannelloni or great northern beans.
     • 1 1/2 cups lower sodium chicken or beef broth.

6. Transfer about 1/3 of the bean mixture to a blender and blend until smooth. Pour back into the sauce pan.

7. Add sausage to the soup. Stir and allow the mixture to heat until simmering. Salt and pepper to taste. Serve hot, and with a dollop of sour cream.

Wednesday, December 12, 2012

Pumpkin Cupcakes, Cream Cheese Frosting with Caramel Filling

I've been craving all things pumpkin. I started out with a pumpkin bar recipe and after a couple of tweaks I've come out with a soft, moist, delicious pumpkin cupcake you will love.
PUMPKIN CUPCAKES
Preheat the oven to 350°F. Fill your cupcake tins with liners.

In a mixer bowl combine and beat until fluffy:
4 eggs
1 tsp vanilla
1 2/3 cups granulated sugar
3/4 cup vegetable or canola oil (I use canola)
15oz can pumpkin

In a separate bowl sift together:
2 cups sifted all purpose flour
2 tsp baking powder
2 tsp ground cinnamon
1 tsp salt
1 tsp baking soda

Add the dry ingredients to the wet and mix on low until just combined do not over mix.
Fill cupcake liners 3/4 full. Place in the center of the oven and bake for 18-20 minutes or until a toothpick inserted in the center comes out clean.

As soon as they are finished remove from the cupcake tin and place on a wire rack to cool. Immediately after they have cooled place in an air tight container. These steps will allow your cupcakes to remain soft and moist. (Again, Do NOT allow to cool in the tin pan.)

CREAM CHEESE FROSTING

In an electric mixer whip together:
1/2 cup butter softened
8oz package of cream cheese softened
1 tsp vanilla

Add and whip together with the cream cheese mixture:
3 cups of confectioners (powdered) sugar

Keep the frosting cold until you are ready to use it.

FILLING
I am still trying to perfect my homemade caramel sauce recipe. So either use some from the store or find a recipe of your own to try.

ASSEMBLY

With a sharp knife gently cut out a hole in the center of your cupcakes and fill almost to the top with caramel. Then frost and serve.

Cupcakes are best eaten the day they are baked. So if you want to split up the work, you can make everything the day before and bake the next day. The cupcake batter will keep in an air tight container in the fridge for about a week. If you use cold batter, you will get a wonderfully mounded top on your cupcake.

Adapted from sweetpeaskitchen.

Funeral Themed Halloween Party

A few years ago my husband and I threw a funeral themed halloween party for six. 
Our beloved Leanard Slipp (three times removed) slipped away just before October 31st. He was known to only a few of us (he was something of a slippery fellow). So the funeral procession was very short. And I am somewhat ashamed to say that we had a good time in spite of our loss. RIP Slipp, RIP. 

The invitation went out with a photo of the deceased and read as follows:

You are respectfully invited to attend a funeral in memoriam of the recently departed Leanard Slipp. Bring your favorite Halloween Treats, Ghoulish games, and frightful films...prepare for a procession of six. Appropriate mourning attire is recommended.

 Above is a photo of the gravestone—which was purchased with Leanard's money of course; and also a picture of the deceased. He was rather wealthy. Below is a photo of Mr. Slipp's unused mansion; we decided to hold the funeral there. (I keep several white sheets on hand. They are handy for all sorts of things.)


My husband and I were caretakers of the grounds. (Although Leanard gave us the slip when our bill was due.)
Below are some of our guests. Some were angry with Mr. Slipp. Some were happy and shocked because they found they had inherited some of Mr. Slipp's wealth.
The mansion walls were covered with images of Mr. Slipp's deceased family members. (Some people have made vintage photos of the deceased available on flickr to download for free.) Also, there were plenty of spiders, bats, and rats to keep us company.
We had soft organ music playing in the background. (Do a google search, you can find funeral organ music for free download.) And of course refreshments were served in honor of Mr. Slipp's final resting place.

Cookie Tubs with Printed Ingredient Cards

We've all seen the cute gift idea with mason jars and ingredients for cookies...but mason jars are expensive! So instead, purchase plastic containers (4 for about 2-3 bucks) and use those instead.

Here, I've created a tag with a photo I took of the cookies, and on the back I put the directions. Then punched a hole in it, tied it with ribbon and delivered! So next time you make your favorite cookies—don't forget to take a picture. You never know when you might need it.

Monday, November 12, 2012

Rapunzel Hair Tutorial

This Rapunzel Hair was a HIT with my niece last Christmas. I am told it is STILL a favorite around the house. You'll probably want a couple of days to work on it, but it's rather easy and well worth the effort. 
SUPPLIES: Two LARGE rolls of yarn • fabric scissors • three rolls of ribbon • three hair ties • hot glue and gun • toothpick • fabric glue • hydrangea blossom • two hair flowers.


Step One: Do not exercise today. Instead roll out three bunches of yarn strands—using up all of your yarn. My groups each had about 52+ strands in each. Length doesn't matter, you choose. Just remember it's about 1/3 shorter when it's braided. (Mine were about 3-ish yards.) Take breaks when needed! This counts as exercise—believe me, you'll feel it.

Step Two: Roll out a length of ribbon across each strand. 
Step Three: With some extra yarn, cut short lengths and loosely tie around the groups of yarn...about every  foot or so. This will keep things from tangling while you are braiding.
Step Four: gather the groups into one at the end and tie off with a hair tie. Begin braiding as tight as you can. Make sure the ribbons stays on top of the strands as you braid. Tip: It helps to "pinch" the end of the braid between your crossed legs.
Braiding tips: As you braid, comb through the immediate section with your fingers to keep the plates of the braid looking nice. You will be moving the long strands back and forth across your lap. Admittedly, this part does get tedious...so take lots of breaks to sneak some cookie dough.

Okay, I will answer your question: those are "knee pads" (tape) on my knees. I taped them up to keep from wearing holes in my jeans as I crawled back and forth laying out the yarn.
Step Five: When you get close to the end, tie it off with another hair tie. Your ends should look something like this, with one long and one short.
Step Six: Using your hot glue, glue all around both hair ties. I mean it. Really get it good. Make sure some of it touches the yarn too. We don't want the kids to slide the hair tie off.
Step Seven: Measure your kiddo's head and make a loop that same size—measuring the INSIDE of the loop—and put the short end in the back. Tie this off and glue the bleep out of it again. You may also want to put glue where the braids overlap for extra support.
Step Eight: Tie a ribbon around it to hide the glue and make a bow. Insert the hair flowers to further hide the end of the braid. (The clips can be removed before washing.) And tie a ribbon around the bottom of the braid as well.
Step Nine: Using a little fabric glue and a toothpick, apply a line of glue along the clipped end of the ribbons. This will keep them from fraying.
Step Ten: Clip the little flowers off the hydrangea stem. Use hot glue along the stamen on the back and a few drops of the back of the petals. Push the flower into the braid. Place the flowers randomly along the braid, including the loop. No swearing when you burn yourself.


You're done! Step back and admire your work. I promise, this braid is going to be played with A LOT, your little one with LOVE it. (Update: it’s 2020, and there are now THREE kids in the house, the braid has survived and is still getting used!)

Care: Hand wash recommended...however, a front load wash on gentle would probably be ok. Use cold water. Air dry...DO NOT put in dryer.

Sparkling Advent Ornaments

Watch this video to see the cutest little handmade advent ornaments made out of sparkly paper. They are easy and intuitive to make. Here yo...